Prerequisites for OIDC Authentication
1. Create an app with your provider
- Google Identity
- Okta
- Azure
First, register the app
Create a project in the Google API Console
Using an account linked to your organization, navigate to the Google API Console and select New project. Within this project, we will configure the OAuth2.0 screen and credentials.
Create OAuth2.0 consent screen
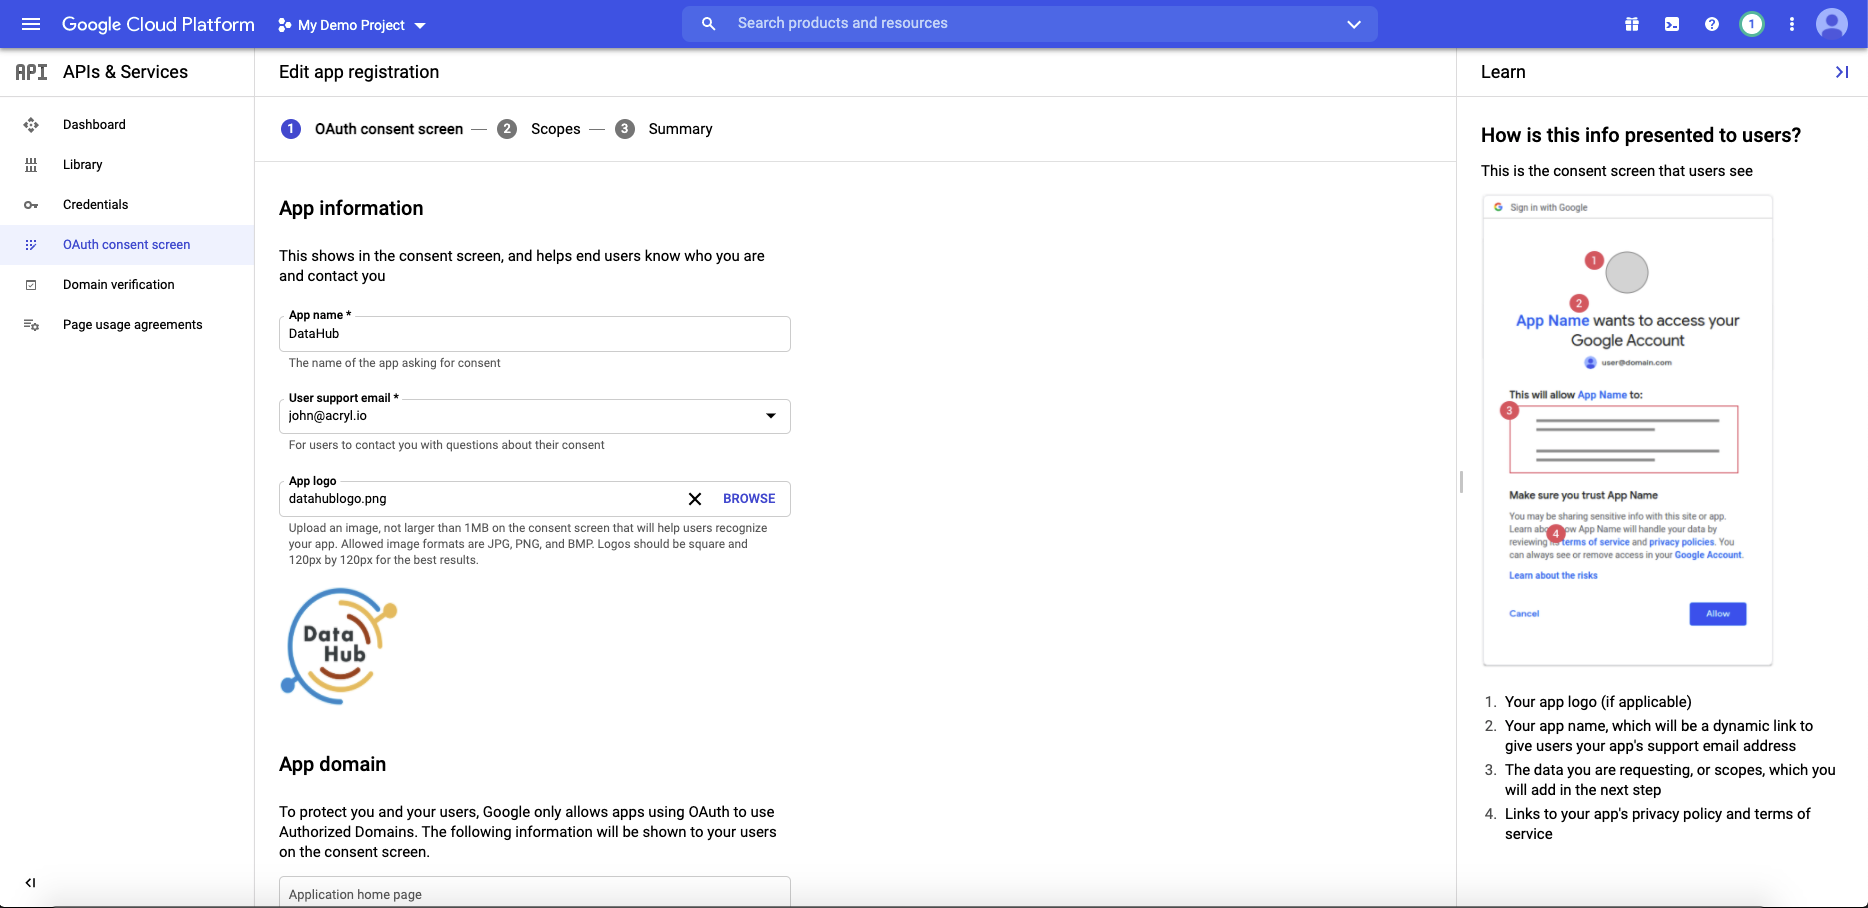
Navigate to OAuth consent screen. This is where you'll configure the screen your users see when attempting to log in to DataHub. Select Internal (if you only want your company users to have access) and then click Create. Note that in order to complete this step you should be logged into a Google account associated with your organization.
Fill out the details in the App Information & Domain sections. Make sure the 'Application Home Page' provided matches where DataHub is deployed at your organization. Once you've completed this, Save & Continue.
Configure the scopes
Next, click Add or Remove Scopes. Select the following scope and click Save & Continue.
- .../auth/userinfo.email
- .../auth/userinfo.profile
- openid
Finally, obtain client credentials and discovery url
The goal of this step should be to obtain the following values, which will need to be configured before deploying DataHub:
- Client ID - A unique identifier for your application with the identity provider
- Client Secret - A shared secret to use for exchange between you and your identity provider
- Discovery URL - A URL where the OIDC API of your identity provider can be discovered. This should suffixed by
.well-known/openid-configuration. Sometimes, identity providers will not explicitly include this URL in their setup guides, though this endpoint will exist as per the OIDC specification. For more info see http://openid.net/specs/openid-connect-discovery-1_0.html.
Obtain Client Credentials
Navigate to the Credentials tab. Click Create Credentials & select OAuth client ID as the credential type.
On the following screen, select Web application as your Application Type. Add the domain where DataHub is hosted to your 'Authorized Javascript Origins'.
https://your-datahub-domain.com
Add the domain where DataHub is hosted with the path /callback/oidc appended to 'Authorized Redirect URLs'. Finally, click Create
https://your-datahub-domain.com/callback/oidc
You will now receive a pair of values, a client id and a client secret. Bookmark these for the next step.
First, register the app
Create an application in Okta Developer Console
Log in to your Okta admin account & navigate to the developer console. Select Applications, then Add Application, the Create New App to create a new app.
Select OpenID Connect as the Sign on method, and Web as the Platform.
Click Create and name your application under General Settings and save.
- Login Redirect URI :
https://your-datahub-domain.com/callback/oidc. - Logout Redirect URI.
https://your-datahub-domain.com/login
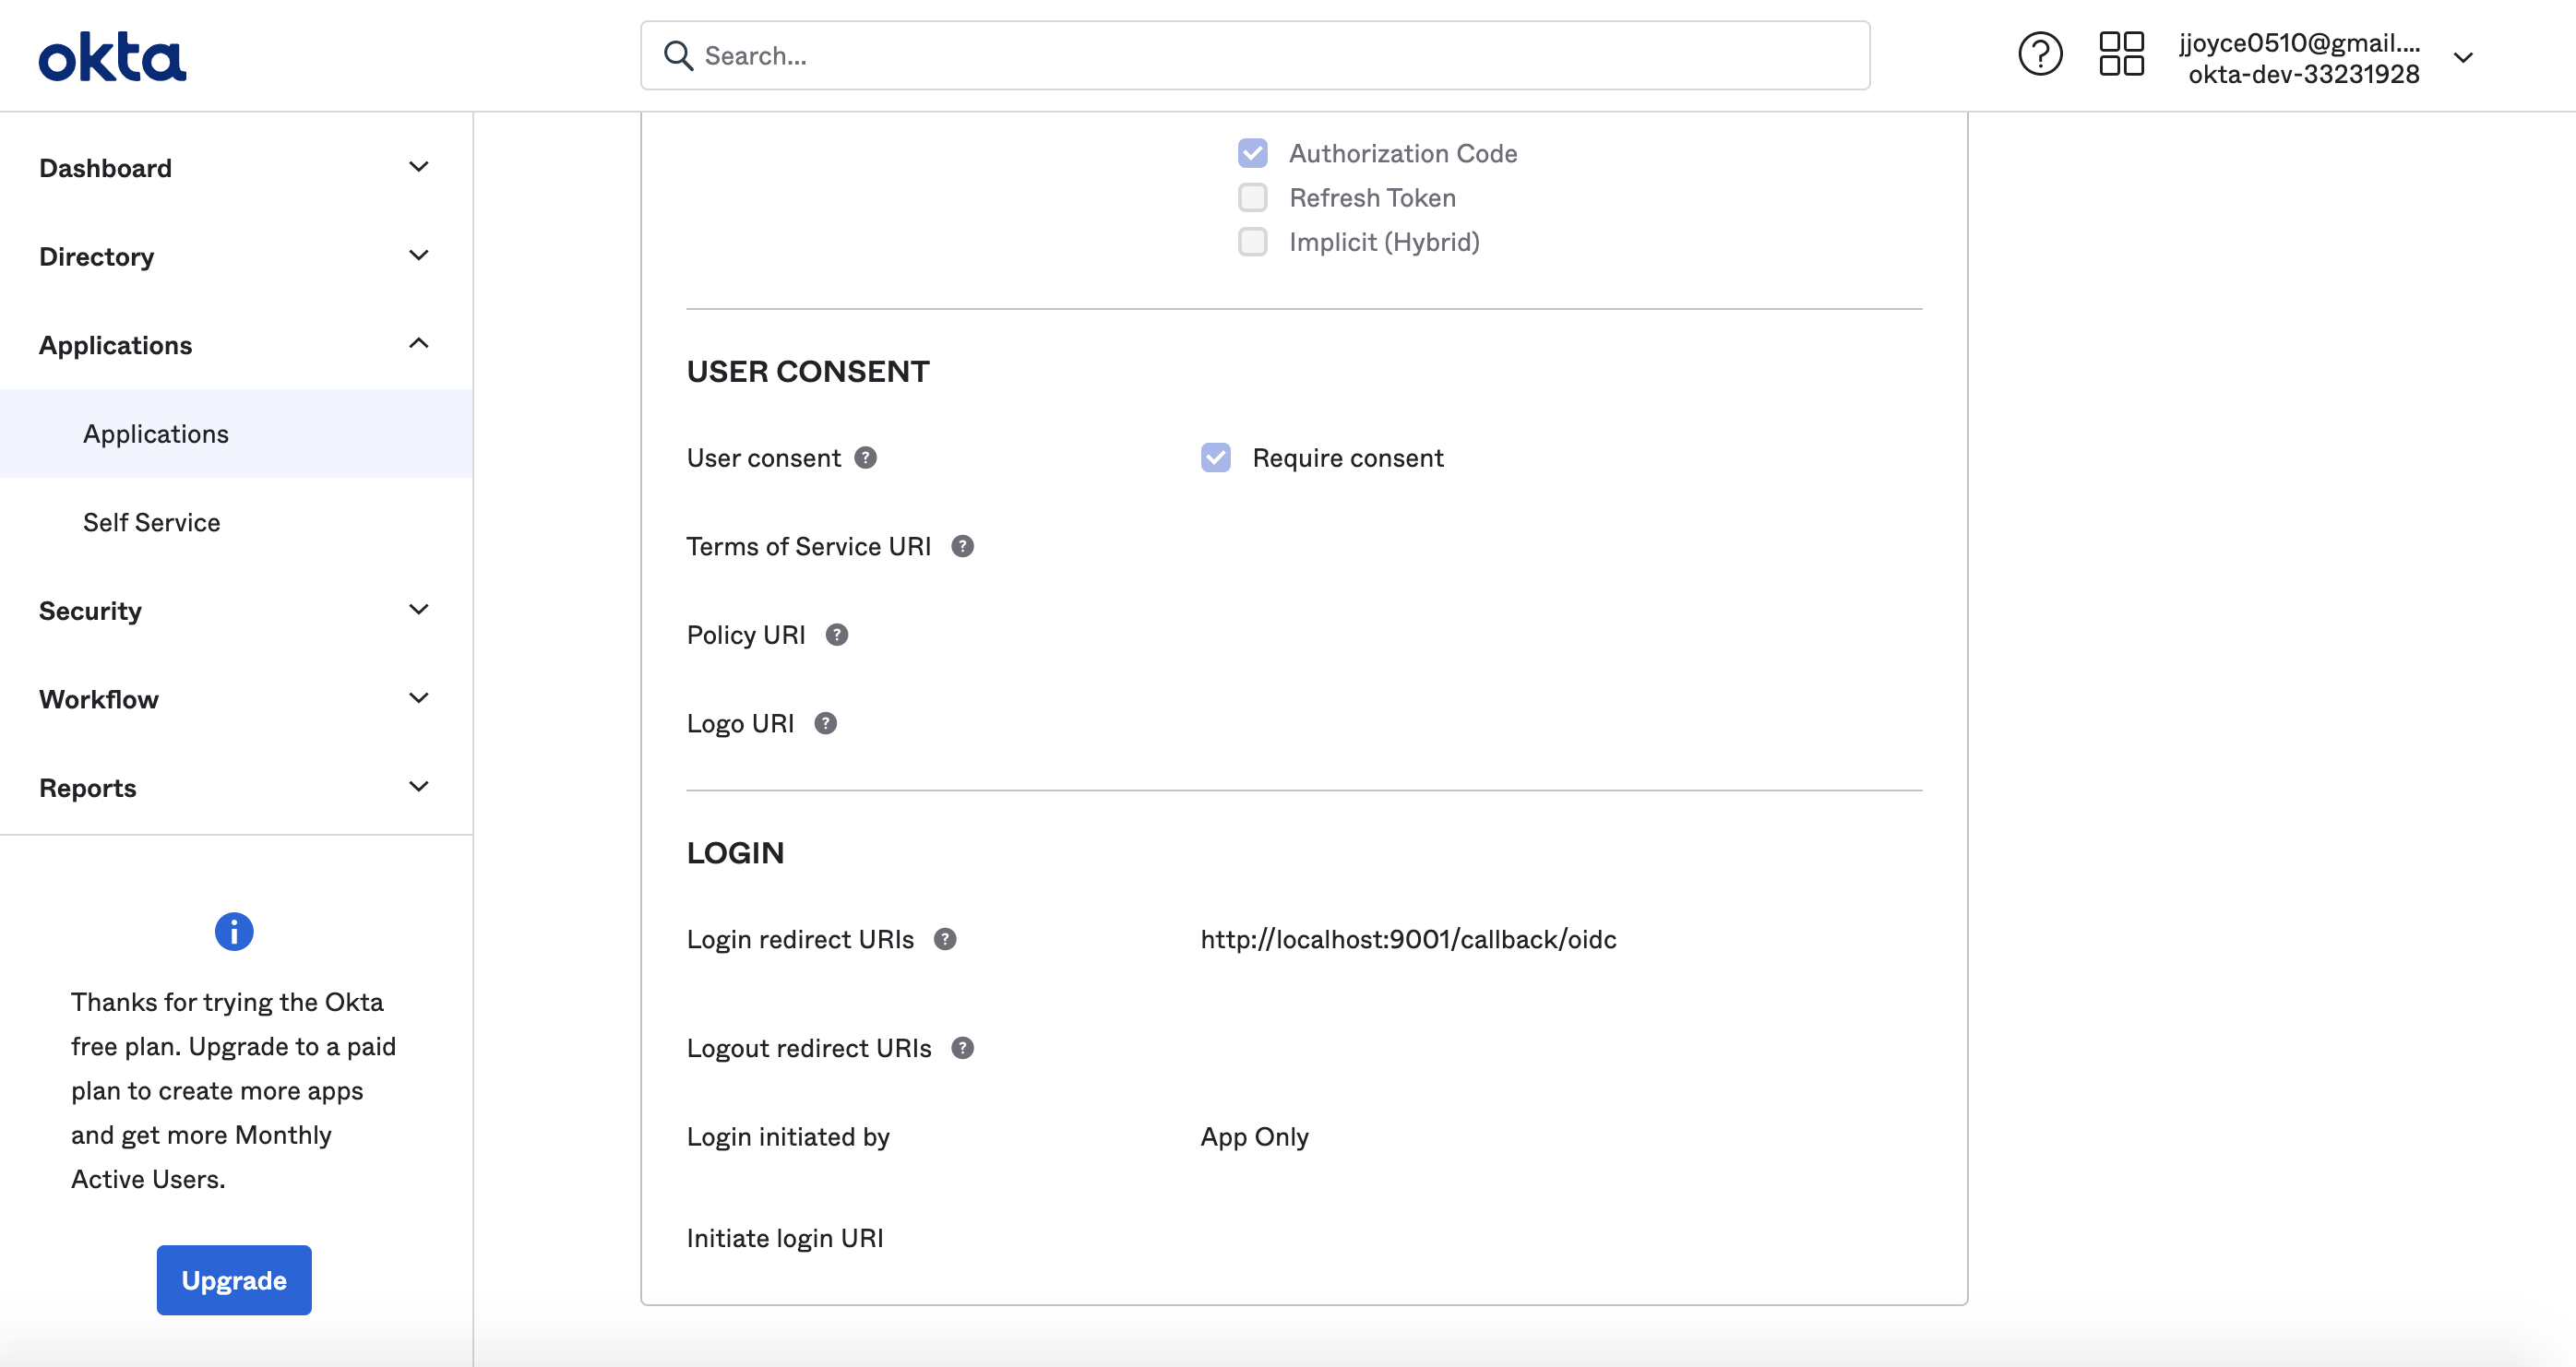
If you're enabling DataHub login as an Okta tile, you'll need to provide the Initiate Login URI. You
can set if to https://your-datahub-domain.com/authenticate. If you're just testing locally, this can be http://localhost:9002.
Finally, obtain client credentials and discovery url
The goal of this step should be to obtain the following values, which will need to be configured before deploying DataHub:
- Client ID - A unique identifier for your application with the identity provider
- Client Secret - A shared secret to use for exchange between you and your identity provider
- Discovery URL - A URL where the OIDC API of your identity provider can be discovered. This should suffixed by
.well-known/openid-configuration. Sometimes, identity providers will not explicitly include this URL in their setup guides, though this endpoint will exist as per the OIDC specification. For more info see http://openid.net/specs/openid-connect-discovery-1_0.html.
Obtain Client Credentials
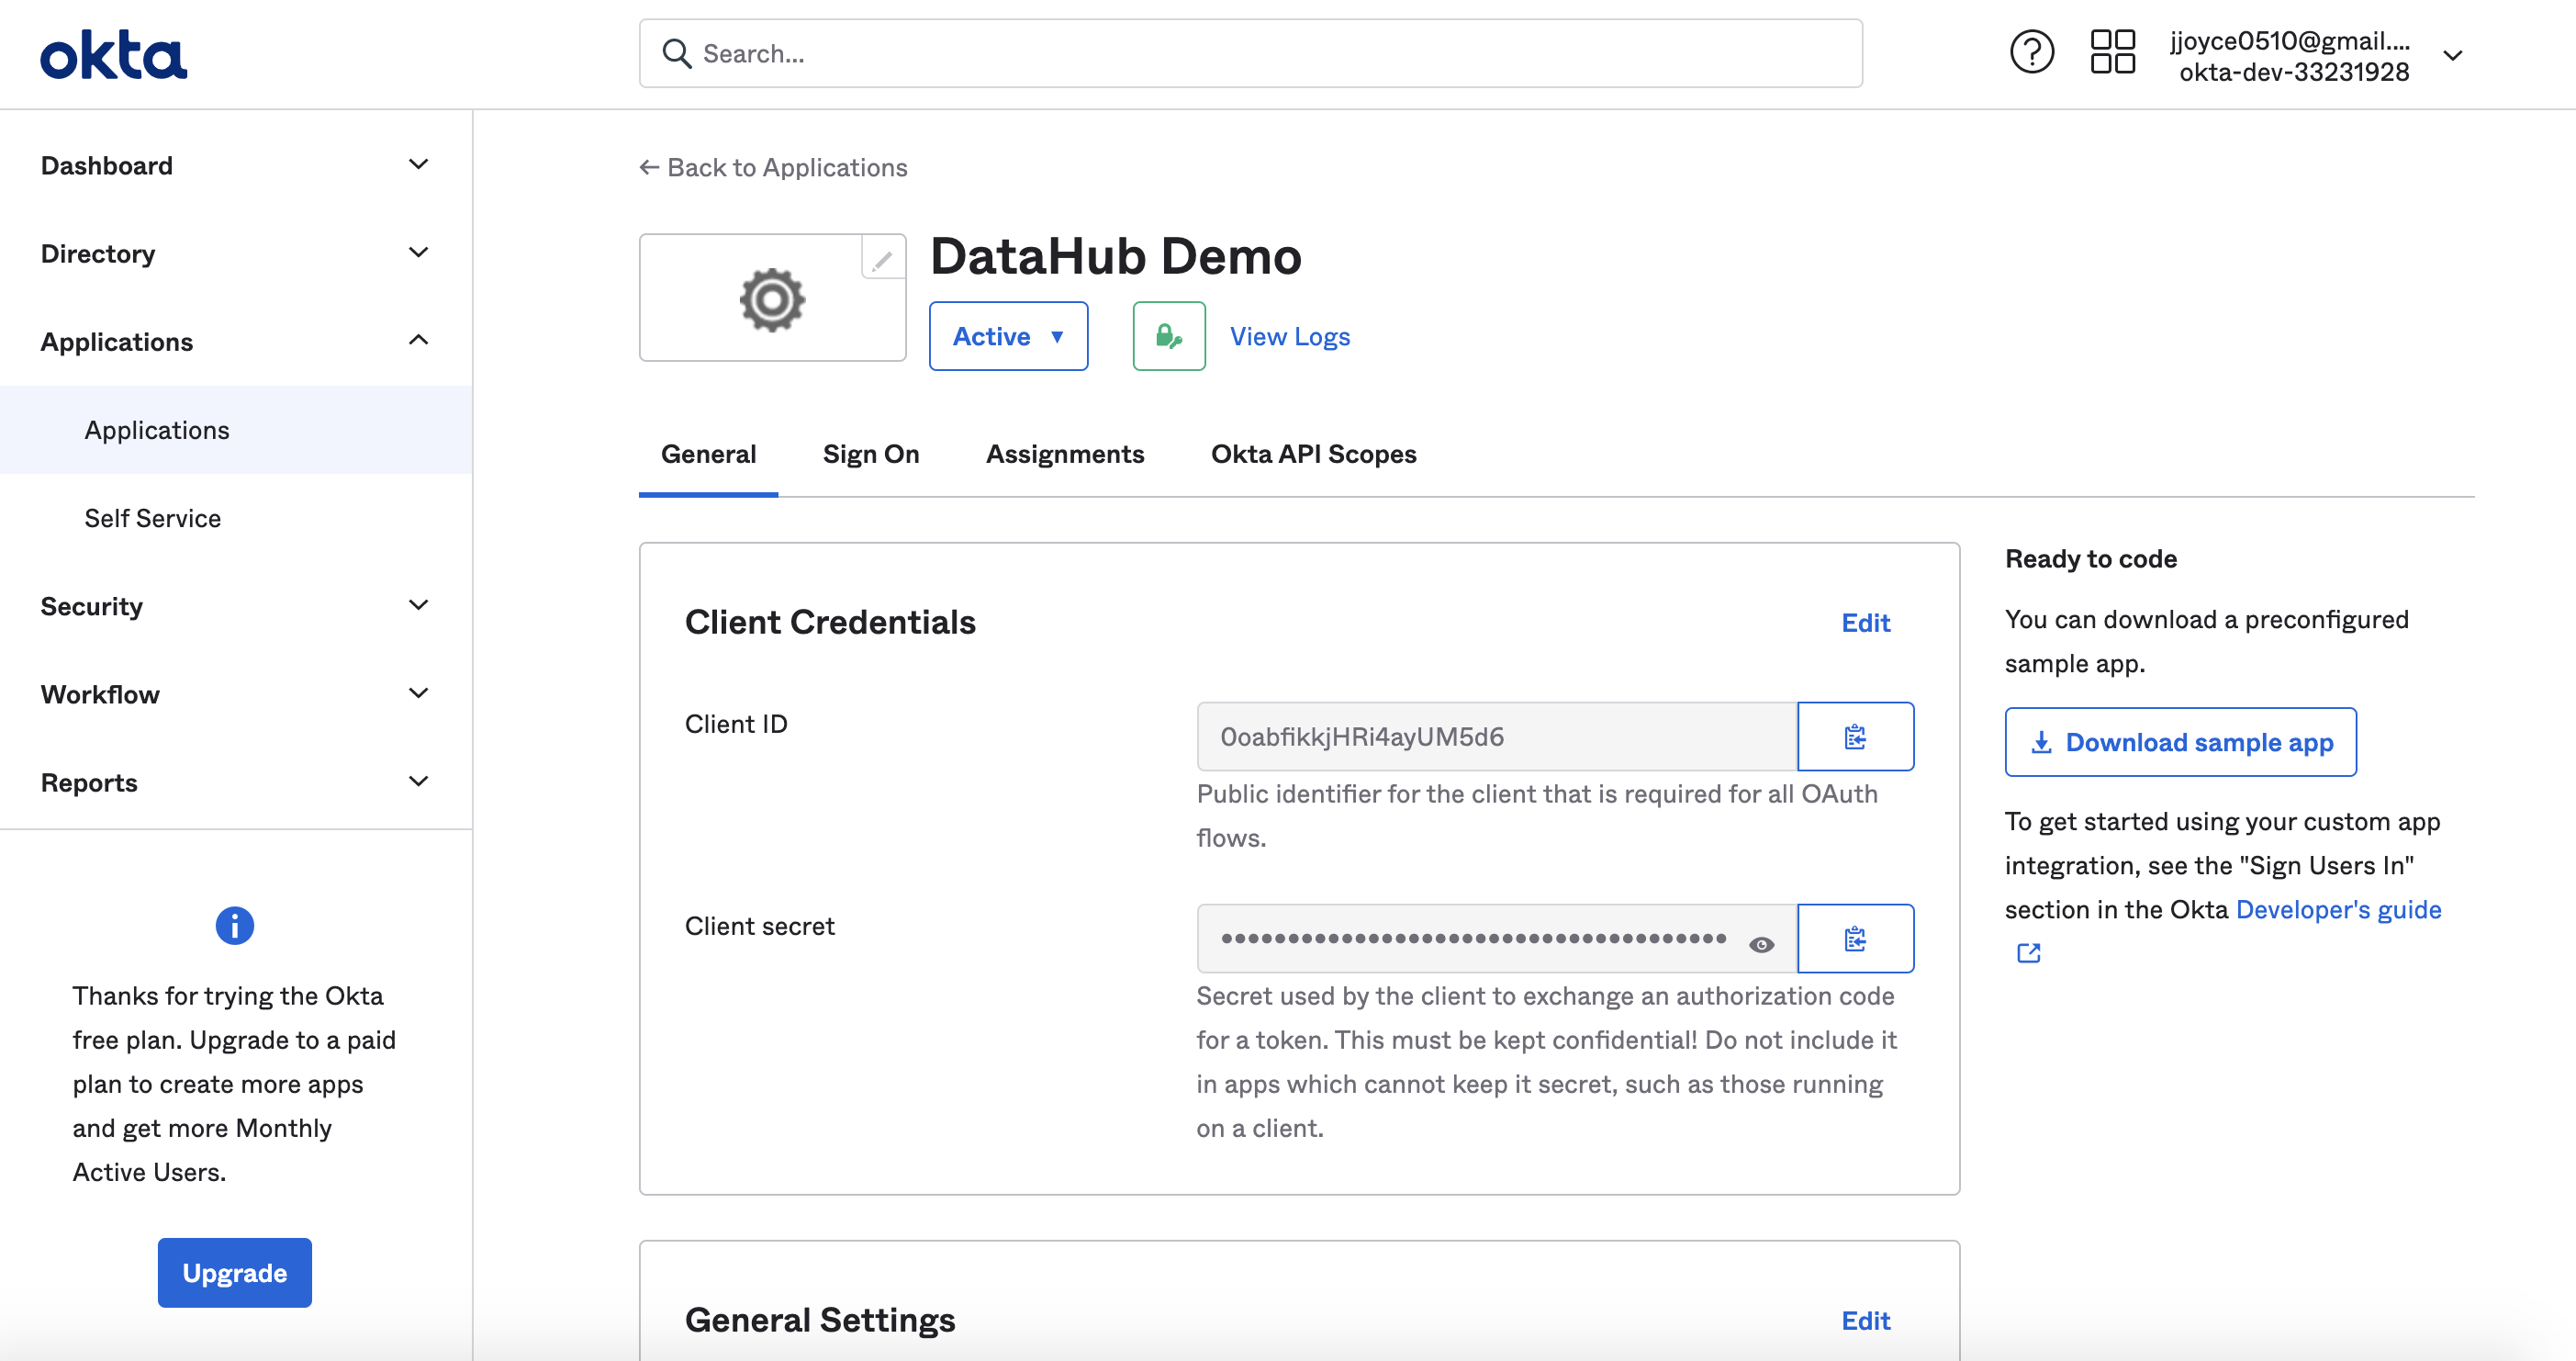
After registering the app, you should see the client credentials. Bookmark the Client id and Client secret for the next step.
Obtain Discovery URI
On the same page, you should see an Okta Domain. Your OIDC discovery URI will be formatted as follows:
https://your-okta-domain.com/.well-known/openid-configuration
For example, https://dev-33231928.okta.com/.well-known/openid-configuration.
At this point, you should be looking at a screen like the following:
First, register the app
Create an application registration in Microsoft Azure portal
Using an account linked to your organization, navigate to the Microsoft Azure Portal. Select App registrations, then New registration to register a new app.
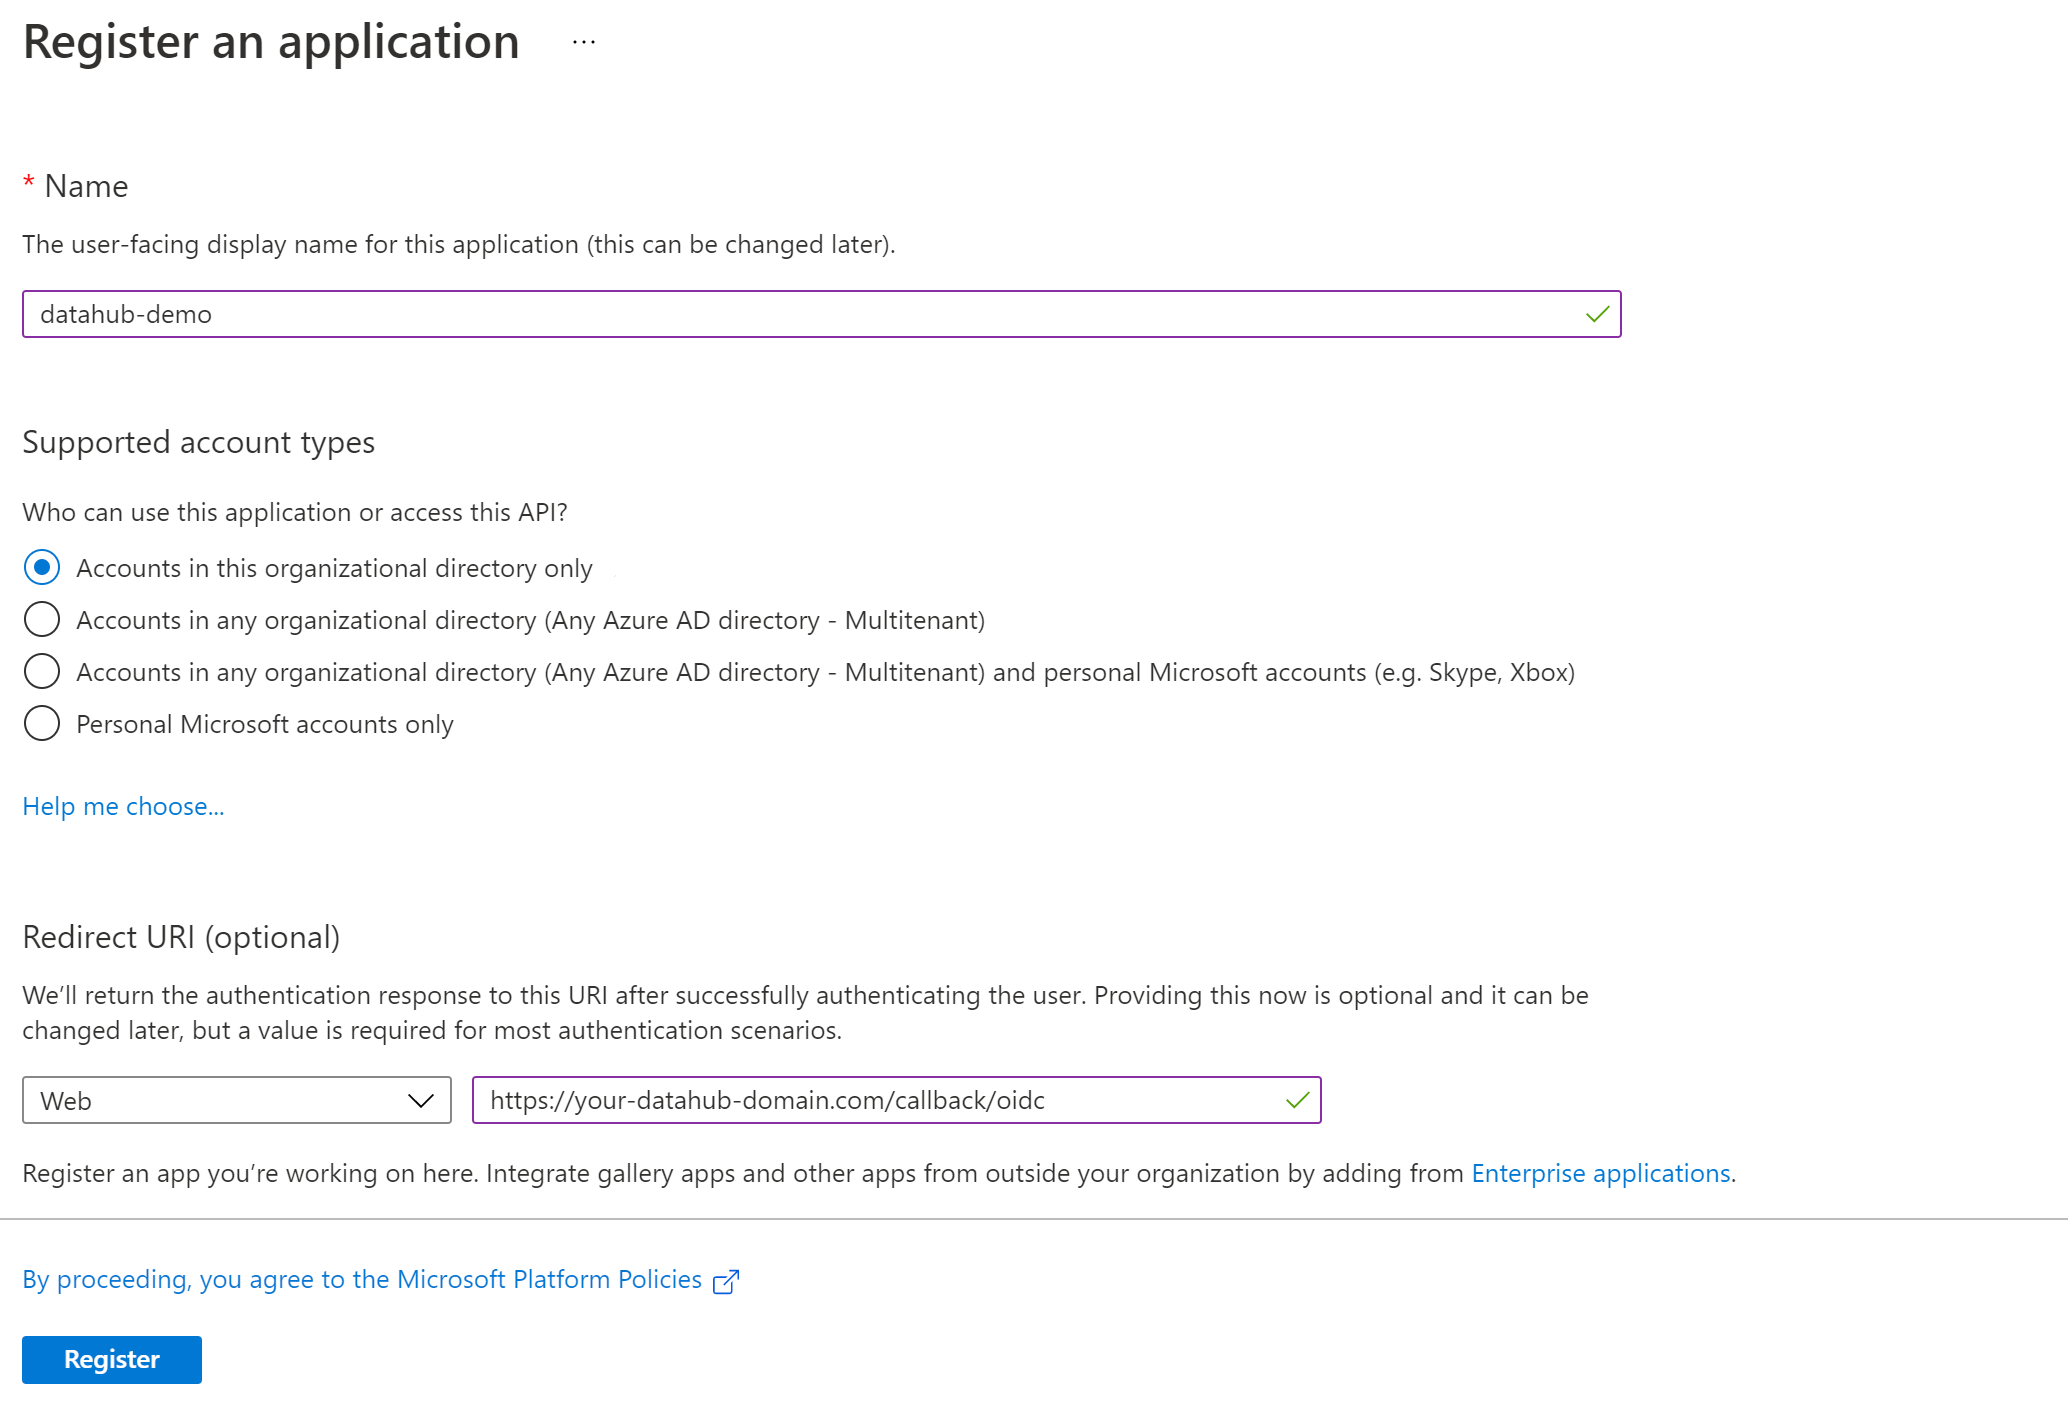
Name your app registration and choose who can access your application.
- Redirect URI : Select Web as type and enter
https://your-datahub-domain.com/callback/oidc
Azure supports more than one redirect URI, so both can be configured at the same time from the Authentication tab once the registration is complete. At this point, your app registration should look like the following. Finally, click Register.
Once registration is done, you will land on the app registration Overview tab.
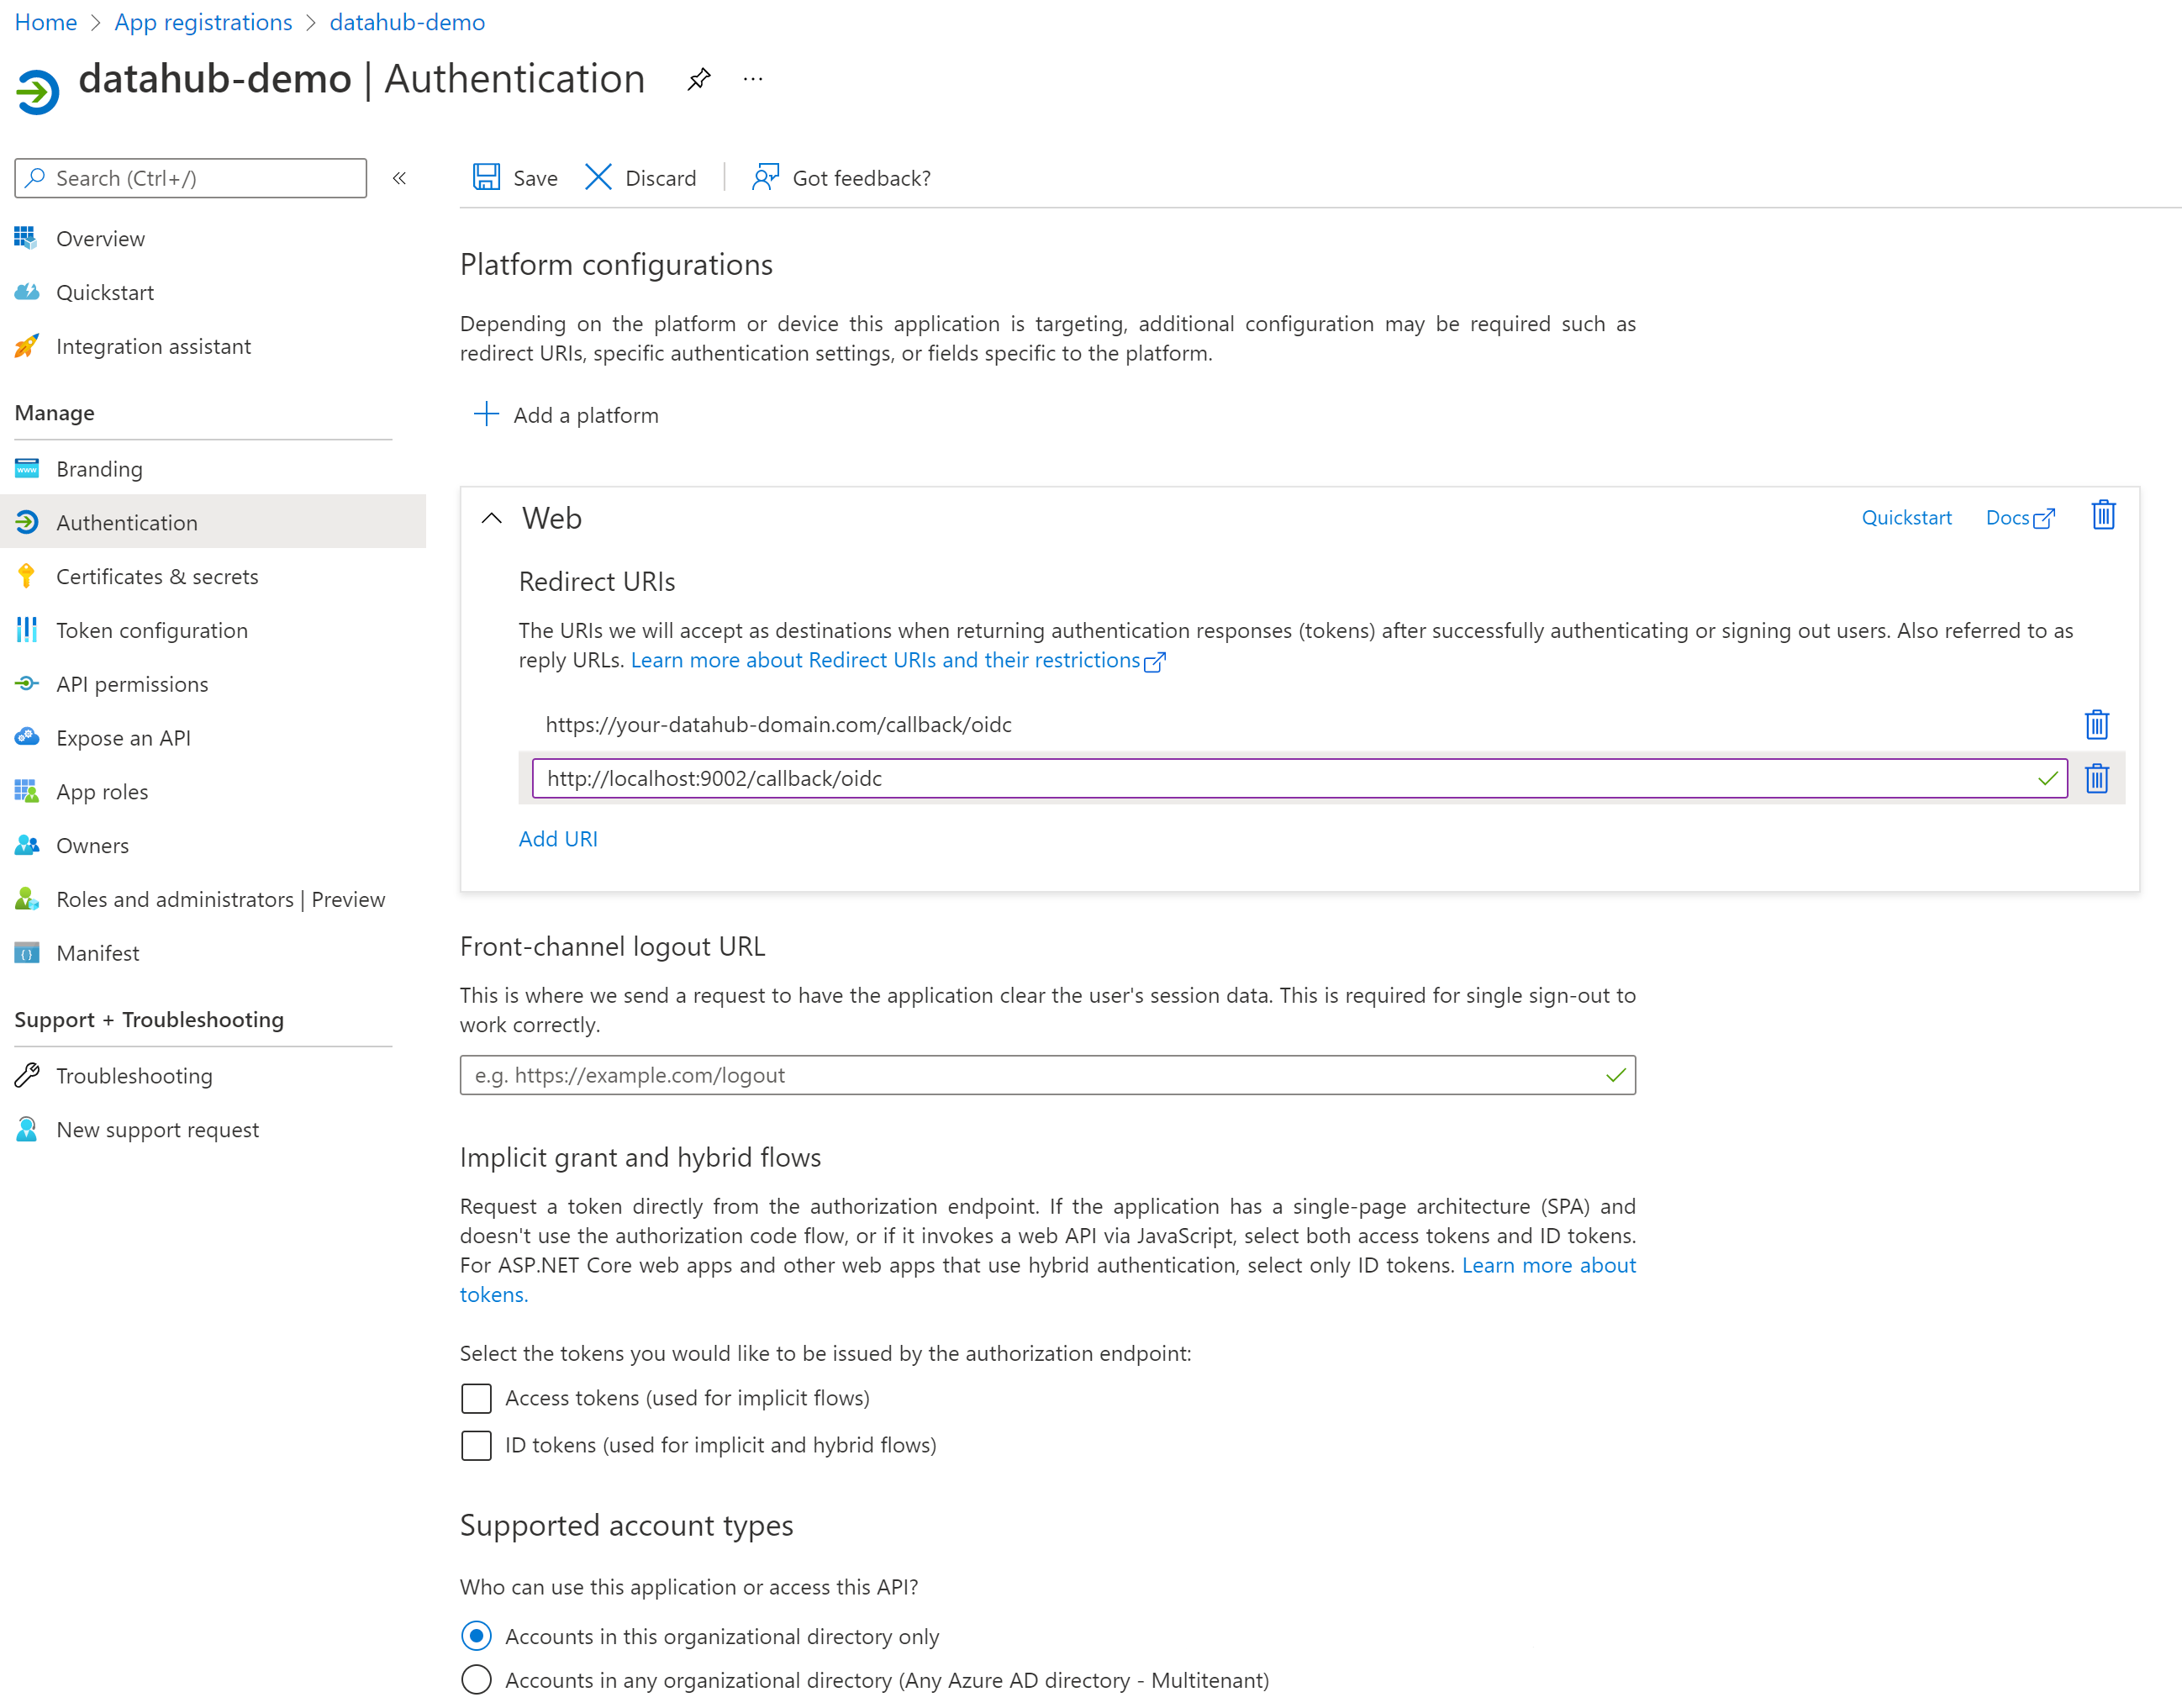
On the left-side navigation bar, click on Authentication under Manage and add extra redirect URIs if need be (if you want to support both local testing and Azure deployments).
For logout URI:
- Front-channel logout URL.
https://your-datahub-domain.com/login
Finally, click Save.
Configure Certificates & secrets
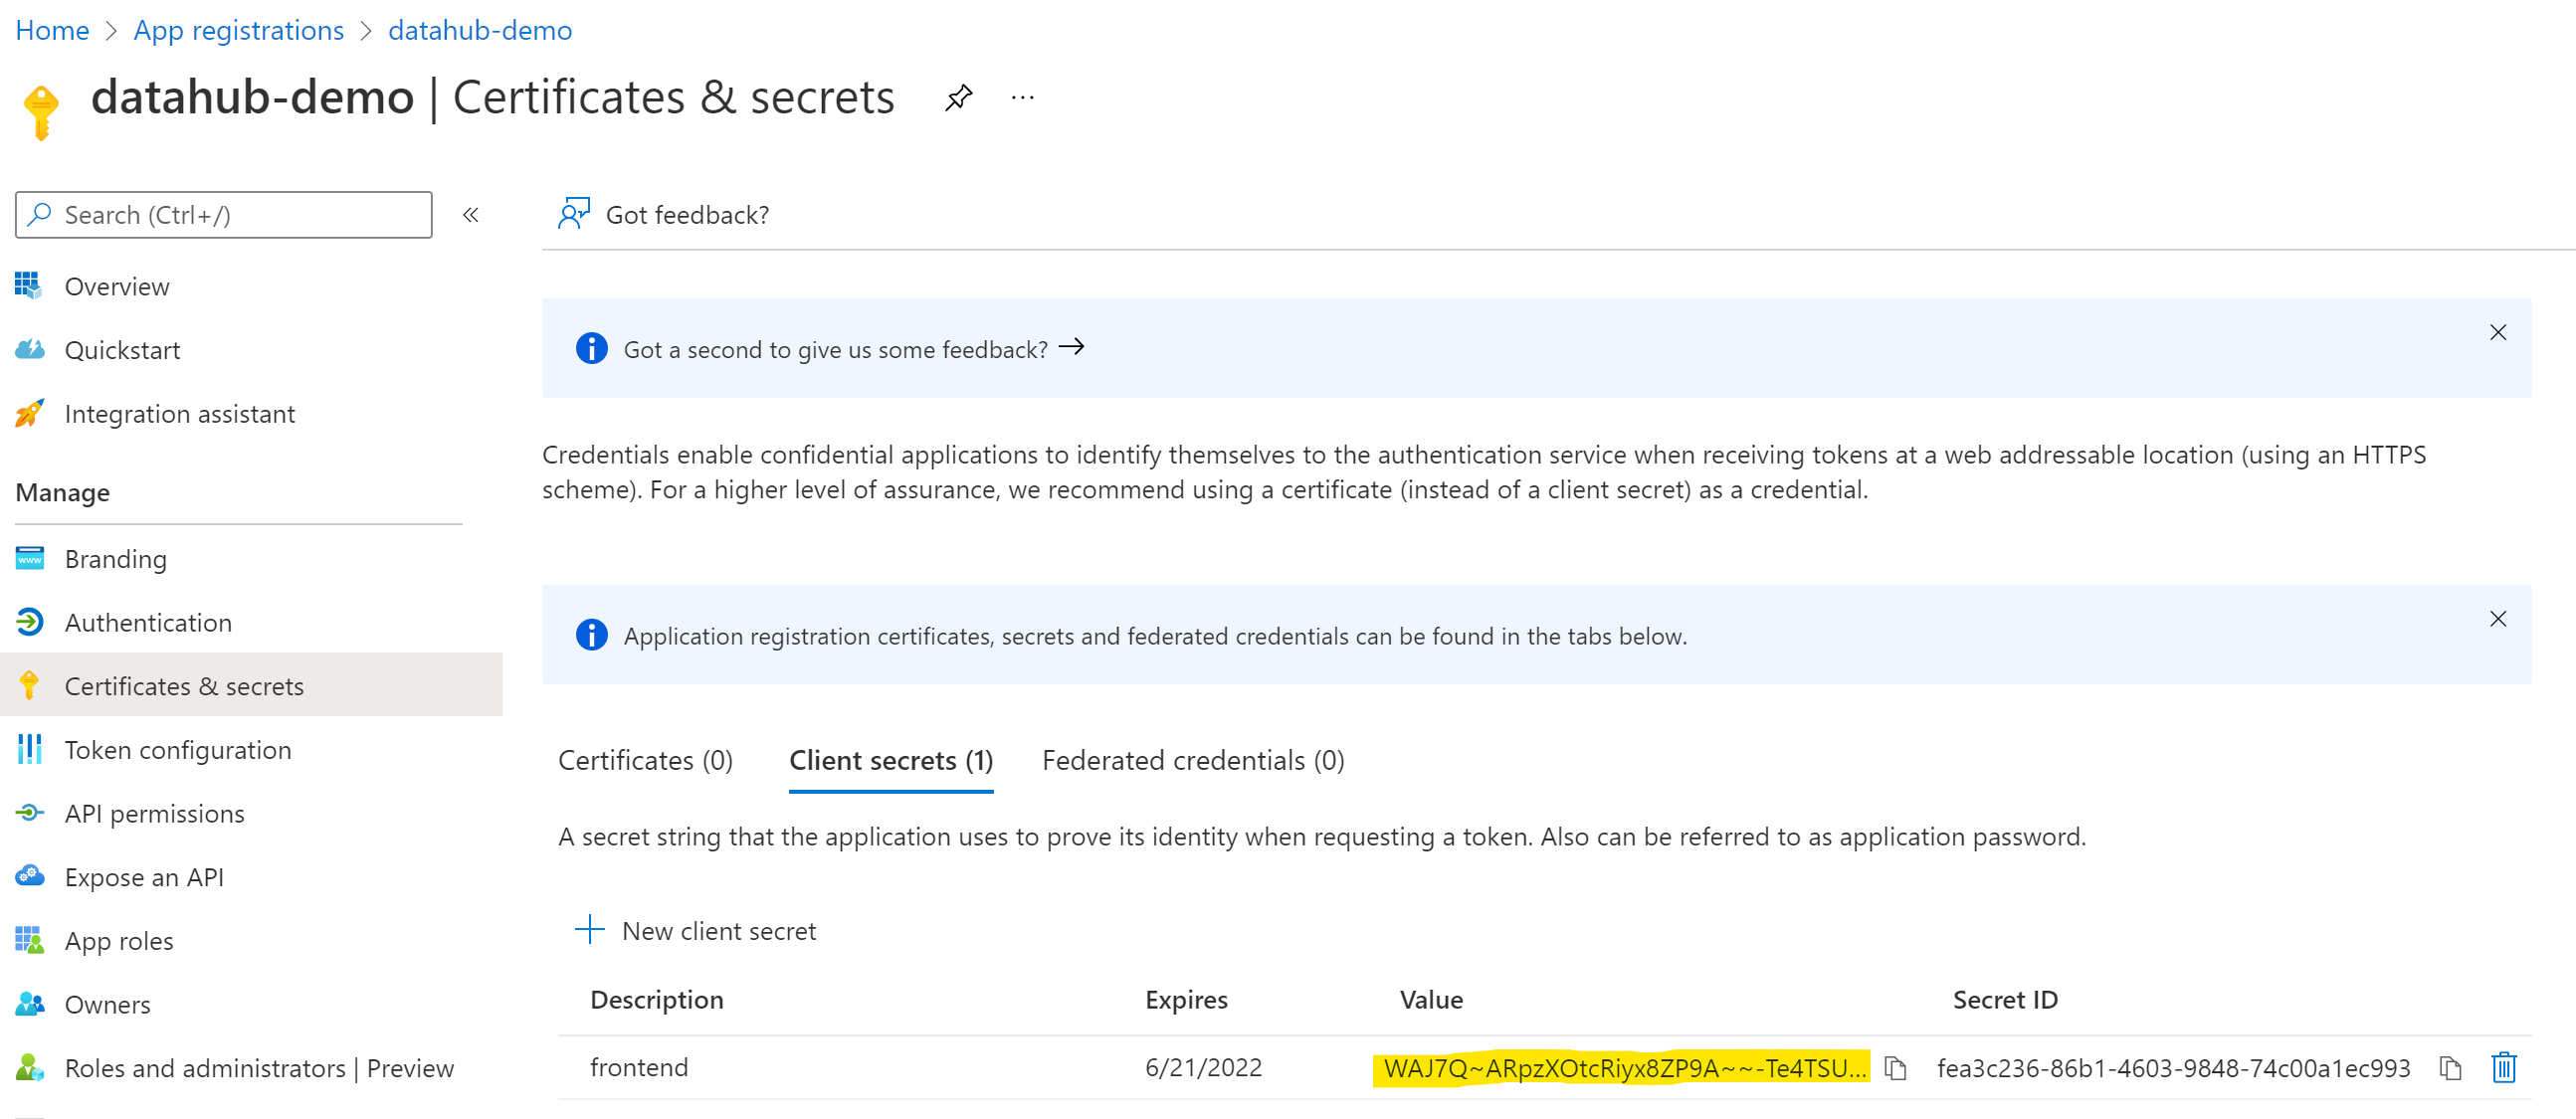
On the left-side navigation bar, click on Certificates & secrets under Manage.
Select Client secrets, then New client secret. Type in a meaningful description for your secret and select an expiry. Click the Add button when you are done.
Copy the value of your newly create secret since Azure will never display its value afterwards.
Configure API permissions
On the left-side navigation bar, click on API permissions under Manage. DataHub requires the following four Microsoft Graph APIs:
- User.Read (should be already configured)
- profile
- openid
Click on Add a permission, then from the Microsoft APIs tab select Microsoft Graph, then Delegated permissions. From the OpenId permissions category, select email, openid, profile and click Add permissions.
At this point, you should be looking at a screen like the following:

Finally, obtain client credentials and discovery url
The goal of this step should be to obtain the following values, which will need to be configured before deploying DataHub:
- Client ID - A unique identifier for your application with the identity provider
- Client Secret - A shared secret to use for exchange between you and your identity provider
- Discovery URL - A URL where the OIDC API of your identity provider can be discovered. This should suffixed by
.well-known/openid-configuration. Sometimes, identity providers will not explicitly include this URL in their setup guides, though this endpoint will exist as per the OIDC specification. For more info see http://openid.net/specs/openid-connect-discovery-1_0.html.
Obtain Application (Client) ID
On the left-side navigation bar, go back to the Overview tab. You should see the Application (client) ID. Save its value for the next step.
Obtain Discovery URI
On the same page, you should see a Directory (tenant) ID. Your OIDC discovery URI will be formatted as follows:
https://login.microsoftonline.com/{tenant ID}/v2.0/.well-known/openid-configuration
2. Next steps
Once you have your Client ID, Client Secret, and Discovery URL you may proceed with next steps.
Cloud
If you're on cloud, the next steps are pretty simple. You can simply paste your obtained credentials into the UI and you'll be done.
Open Source
If you're on open source, you'll want to configure your server among other things.